Monday, December 20, 2010

White Chocolate Macadamia Nut Cookies


I baked cookies and didn't burn them which is good because these happen to be Aubrey's favorite cookies. 

Me: Aubrey, how would you describe the cookies I just made?
Aub: Good.
Me: No, like if you had to describe the flavor?
Aub: Delicious.
Me: No, I mean, so I could tell people what they taste like?!?!?
Aub: Extra delicious.

Ugh. Let's just give some background info-- I'm not a huge white chocolate fan and I couldn't classify "White Chocolate Macadamia Nut" as my favorite cookie, despite Aubrey's insistence that I just need to try one every  time we go to Subway. I have tried one. Many times.  And, I still don't choose it.  With that said, I ate about 14 of these in 10 seconds flat. Or, maybe over the course of two days, but, I could have and that's the point. Yay for perspective.

White Chocolate Macadamia Nut Cookies ( a.k.a. The best cookies I've ever made)
Makes about 4 dozen ( Adapted from recipe found at allrecipes.com)

Ingredients 

1 cup butter, softened
3/4 cup packed light brown sugar
1/2 cup white sugar
2 eggs
1 teaspoon vanilla extract
2 1/2 cups all-purpose flour
1 teaspoon baking soda
1/2 teaspoon salt
1 cup coarsely chopped macadamia nuts
1 cup coarsely chopped white chocolate or white chocolate chips

  1. Preheat oven to 350 degrees F
  2. In a large bowl, cream together the butter, brown sugar, and white sugar until smooth. Beat in the eggs, one at a time, then stir in the vanilla extract.
  3. Combine the flour, baking soda, and salt in a separate bowl; gradually stir mix into the creamed mixture. 
  4. Fold in the macadamia nuts and white chocolate. Drop dough by teaspoonfuls onto ungreased cookie sheets.
  5. Bake for 10-12 minutes in the preheated oven, or until golden brown.

Wednesday, December 15, 2010

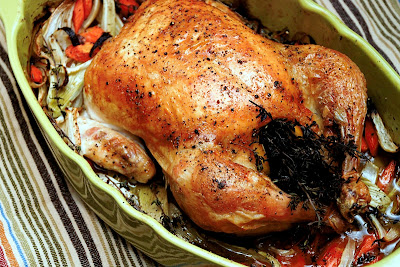
Perfect Roast Chicken


Really. That's all there is to it.

Perfect Roast Chicken
 Not adapted at all from the amazing, Ina Garten.


 Ingredients

1 (5 to 6 pound) roasting chicken - I highly recommend organic. It is so choice.
Kosher salt and fresh ground pepper
1 bunch of Thyme plus 20 sprigs
1 lemon, halves
1head of garlic, halved crosswise
2 Tbsp. melted butter ( 1/4 stick)
1 large yellow onion thickly sliced
4 carrots cut into 2-inch chunks on a diagonal
1 bulb of fennel cut into wedges, tops removed
Olive Oil


1.Preheat the oven to 425 degrees F.
2. Remove the chicken giblets. Rinse the chicken inside and out. Remove any excess fat and leftover pin feathers and pat the outside dry.
3.Liberally salt and pepper the inside of the chicken. Stuff the cavity with the bunch of thyme, both halves of lemon, and all the garlic.
4. Brush the outside of the chicken with the butter and sprinkle again with salt and pepper. Tie the legs together with kitchen string and tuck the wing tips under the body of the chicken.
5. Place the onions, carrots, and fennel in a roasting pan. Toss with salt, pepper, 20 sprigs of thyme, and olive oil. Spread around the bottom of the roasting pan and place the chicken on top.
6. Roast the chicken for 1 1/2 hours, or until the juices run clear when you cut between a leg and thigh. 7.Remove the chicken and vegetables to a platter and cover with aluminum foil for about 20 minutes. Slice the chicken onto a platter and serve it with the vegetables.

Note: I highly recommend using a roasting pan that allows all sides of the chicken to be exposed, otherwise your skin doesn't get so crisp and golden. 

Monday, December 13, 2010

Sourdough, Wild Mushroom, Bacon Stuffing

If you're like me and already thinking about Christmas dinner, you might be itching to try a new  accompaniment dish. Then again, you might have more important things to think of than a side dish for a meal two weeks out but, this is a food blog so, odds are you're like me and already wondering what the crap you're gonna do to make the holidays special. I'll tell you what you can do. Make this stuffing already and be quick about it.


Okay, there's nothing really quick about this. I think the loving care you put into cultivating the perfection of every morsel is worth it and will be totally be noticable by your guests...well, assuming they take the time to chew versus inhale because, folks, this has bacon in it. Oh yeah. And, three types of mushrooms. And, lots and lots of tart sourdough and herbs and all things good in this world. And, bacon.


Sourdough, Wild Mushroom, Bacon Stuffing
Adapted slightly from original Bobby Flay version( Featured on Throwdown episode with our very own, Pioneer Woman)

Ingredients

1 1/4 pounds sourdough bread, crusts trimmed, cut into 1/2-inch cubes (about 12 cups)
1/2 pound shiitake mushrooms, stems removed, coarsely chopped
1/2 pound oyster mushrooms, coarsely chopped
1/2 pound cremini mushrooms, thinly sliced  ( NOTE: If you have no money like me, do 1 lb of cremini, 1/4 pound oyster and 1/4 pound shiitake--- you'll save bucks and not sacrifice much flavor.)
4 tablespoons extra virgin olive oil, divided
Salt and freshly ground black pepper
3/4 pound slab bacon, cut into 1/2-inch dice
1 large yellow onion, finely diced
5 cloves garlic, finely chopped
3 to 5 cups homemade chicken stock or low sodium canned chicken broth
2 large eggs, lightly beaten
3 tablespoons finely chopped fresh sage
2 tablespoons finely chopped fresh thyme leaves
1/2 cup chopped fresh flat-leaf parsley


1.Preheat the oven to 350 degrees F.

2. Spread the bread onto a large baking sheet (or 2 smaller baking sheets or 4 extra small baking sheets) in an even layer and bake, stirring a few times, until lightly golden brown, about 12-15 minutes. Remove and let cool. Once cooled, put the cubes into a very large bowl.

3.Increase the heat to 375 degrees F. Combine the mushrooms in a large baking dish or baking sheet, toss with 3 tablespoons of the oil, and season with salt and pepper. Roast in the oven, stirring several times, until soft and goldeny brown, about 25 minutes.

4.While the mushrooms are roasting, heat the remaining 1 tablespoon of the oil in a large high-sided saute pan over medium heat. Add the bacon and cook, stirring occasionally, until golden brown and the fat has rendered, about 10 minutes. Remove the bacon with a slotted spoon to a plate lined with paper towels.

5. Remove all but 2 tablespoons of the rendered fat in the saute pan and place back on the stove over high heat. Add the onion and cook until soft, about 4 minutes. Add the garlic and cook for 1 minute. Add 3 cups of the chicken stock and the herbs, season with salt and pepper, and bring to a simmer.

6. Add the mushrooms to the bread, and then add the onion/stock mixture, egg, salt and pepper, and gently stir until combined. The dressing should be very wet, add more stock as needed. Scrape the mixture into a buttered 13 by 9 by 2-inch glass baking dish. Cover with foil and bake for 20 minutes. Remove the foil, and continue baking until the top is golden brown, about 30 to 40 minutes longer. Remove from the oven and let cool for 10 minutes before serving.

Note again: You want the dressing very wet but be careful not to go crazy. This stuff absorbs moisture like crazy and before long, you're stuff will look "very wet" but really be a swamp which tacks on a lot of cooking time and makes the flavor much saltier. Still good, though, so do whatever you want.

Monday, December 6, 2010

House Salad


Aubrey and I recently enjoyed a dinner at Caz's Chowhouse, a newish downtown eatery in the Brady district. In addition to having a cool and cozy atmosphere (fireplace, brick walls, exposed bulbs, dark wood, vintage decor... right up my alley) they also have inspired my new favorite salad. Essentially, it's their house salad which features sliced granny smith apples, mixed greens, feta cheese, and sugared walnuts with their lemon herb vinaigrette. I dug it but felt it needed something a little sweet to round out all the tartness that the sugared walnuts just couldn't handle. I had some dried apricots and voila! Also, I had to whip up a lemon herb vinaigrette which is quite different from theirs but still tasty. Give it a go. Also, go to Caz's and order the Chicken and Biscuit. I give you permission to eat it all in one sitting.


Lemon-Herb Vinaigrette ( best applied to our House Salad - quantities are approximate)
1/4 cup Extra Virgin Olive Oil
2 Tbsp. Lemon Juice
2 tsp. Red Wine Vinegar
1/8 to 1/4 tsp. salt ( depending on how you like it)
1/4 tsp to 1/2 tsp. Herbs de Provence ( or, seriously, whatever herbs you feel like adding. Tarragon would be good... or basil!)
1/2 tsp. white sugar

Optional- I read a recipe that was basically this but added a dollop of dijon mustard without the sugar. I think I'll try this next time.

Mix together and drizzle on salad. Eat it.

Saturday, December 4, 2010

Busy

Life's been busy. I took a new job, survived Thanksgiving, ate a giant vat of cheese puffs,  hosted a wicked Halloween party...and, probably some other stuff. Also, my Dad was here from SoCal and completely remodeled my dining room. Steampunk?


 We think so.

For the record, this is the third light fixture I bought for this room. Fortunately, Aubrey hasn't thrown me out. You see, I have trouble with decisions. Not big ones. Just small ones like, what to order, what to wear, what furniture to buy. For example, I donated hundreds of dollars to Ikea due to a recent round of impulse purchases only to resell on craigslist within a week. Not so easy to change your mind when the nearest store is four hours away ( a fact I learned all too late.) In fact, I've got a buddy returning some stuff for me AS I TYPE. It's a problem. One thing I know for sure is that I must own the new Le Crueset Ocean colored 4 1/2 qt. Dutch oven with included trivet sold exclusively at Williams Sonoma which can be purchased here. Anyone? I won't return it, promise.

Hey! It's almost Christmas now. Hopefully I'll be back before next year.

Saturday, September 18, 2010

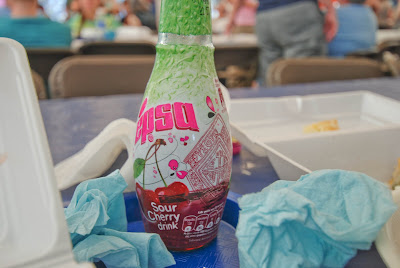
Greek Fest 2010

There are some foods enjoyed while traveling that I just haven't attempted to replicate (not that I could even do so successfully.)  Pain Au Chocolat, Doner Kebab, Duck Confit... and Gyros, to name a few. Sadly, the three former haven't graced my mouth in a long time. Fortunately, Gyros come once a year to good ol' Oklahoma.
You know, I'm not sure if there's an awesome Greek restaurant in Tulsa. If there is, I could stop this whole "once a year" nonsense.  Someone please let me know because I'm not sure I can wait another year for this stuff. Also, I need more of these squares of feta in my life...

And these balls of honey...  Actually, don't tell me about any Greek restaurants in town unless they have these honey dumps ( proper name escapes my mind. I was too busy trying to make sure I got my fair share of these before Aubrey inhaled them.)
It's okay if any Greek restaurants in town don't serve this stuff...
The term "cough syrup" comes to mind. But, hey, had to try it. If you're local, you have a chance to score some delicious grub. Greek Fest runs through tomorrow. Get the scoop here.

Wednesday, September 8, 2010

Jerk Chicken


Aubrey recently spent a week in Yellowstone backcounty equiped with a can of bear spray, some underwear, and a backpack full of dehydrated food ( there might of been some other items essential for survival, too.) He organized his meals by day in ziploc gallon bags. Cute, but certainly not appetizing. At least not my style of appetizing but, then again, I've never spent a week hiking 10 miles a day with 50 pounds on my back and no shower. I'm sure then anything would be tasty. 
Nevertheless, after a few days of making his own meals in a plastic pouch, he was missing me. I don't think we made it to the front door before he started a running list of all the meals I needed to make him asap. Before kissing me hello, he requested this jerk chicken... and, I get it. I would totally understand if this was his LAST meal request. This is some good chicken. And, it's really fun to place a plate piled with browned and juicy chicken  in front of a man who's just spent a week with three non-showered guys in a leaky tent. It's good to be appreciated.

Jerk Chicken
Gourmet, May 2002

There's no standard recipe for jerk chicken. Some are screamin' hot while others really allow you to feel the complex warming spices. Jerk chicken typically shows up in mid summer cookouts but I think it's great for early fall when I am craving some cinnamon and nutmeg. I used serrano peppers in this version but you can turn up the heat with habaneros or scotch bonnets.

For the marinade:

3 scallions, chopped
4 large garlic cloves, chopped
1 small onion, chopped
4 to 5 fresh chiles ( Serrano, Scotch Bonnet, Habenero...your choice), stemmed and seeded
1/4 cup fresh lime juice
2 tablespoons soy sauce
3 tablespoons olive oil
1 1/2 tablespoons salt
1 tablespoon packed brown sugar
1 tablespoon fresh thyme leaves
2 teaspoons ground allspice
2 teaspoons black pepper
3/4 teaspoon freshly grated nutmeg
1/2 teaspoon cinnamon


For the Chicken
Roughly 3 lbs of chicken, portioned- I used 10 drumsticks but you could use any combination of dark or white meat.

1.Add ingredients to a food processor or blender and mix until smooth.

2.Place marinade in a large Ziploc bag ( or, two bags if needed) and add chicken, shaking to coat. Sealm pressing out any excess air and place bag in a shallow dish ( to avoid any drippage.) Marinate for at least 2 hours and up to a day in the fridge.)

3.Remove chicken from fridge one hour prior to grilling.

For Gas Grill
Preheat burners on high, then adjust heat to moderate. Cook chicken until well browned on all sides, 10 to 15 minutes. Adjust heat to low and cook chicken, covered with lid, until cooked through, about 25 minutes more.

For Charcoal Grill ( from Epicurious)

Open vents on bottom of grill and on lid. Light a large chimney of charcoal briquettes (about 100) and pour them evenly over 1 side of bottom rack (you will have a double or triple layer of charcoal).

When charcoal turns grayish white and you can hold your hand 5 inches above rack for 3 to 4 seconds, sear chicken in batches on lightly oiled rack over coals until well browned on all sides, about 3 minutes per batch. Move chicken as seared to side of grill with no coals underneath, then cook, covered with lid, until cooked through, 25 to 30 minutes more.

Saturday, September 4, 2010

Skillet Cornbread

First- I'm calling this summer officially completed.
Now-Enter skillet cornbread. Nothing is tastier on a crisp fall day than some old-fashioned beans and skillet cornbread. ( wishful thinking here in OK... not quite there yet.)
I'll get to the beans someday but let's devote our attention where attention is due. Look at those crisp brown edges...those buttery crevices ( buttery crevices?)...the rustic presentation....  Okay, quit looking. Just go make some. You'll never use a boxed mix again.

Skillet Cornbread
Adapated from The Pioneer Woman

The key to this cornbread is a piping hot skillet and a properly preheated oven so don't rush it! Also, you can make this in a casserole or baking dish but that hot skillet really sends those browned edges into a whole new realm of tastiness. LodgeLogic makes high quality and affordable cast iron skillets ( and a panini grill and press that would make a really great birthday present for someone...just sayin.)

Ingredients

¼ cup plus two Tbsp. unsalted butter

1 cup Yellow Corn Meal
½ cup All-purpose Flour
1 tsp. Salt
1 cup Buttermilk ( don't sweat if you don't have it... just add a Tbsp. of lemon juice to a cup of milk and let sit at room temp. for 5 minutes- Voila! Buttermilk!)
½ cup Milk
1 large Egg
1 Tbsp. Baking Powder
½ tsp. Baking Soda  ( PLEASE, don't confuse the baking powder and baking soda measurements. It tastes nasty when you do. Trust me.)


1.Preheat oven to 450 degrees.
2. Melt butter
3. Combine cornmeal, flour and salt in a bowl. In a separate bowl, combine egg, buttermilk, and milk.
4. Join in happy matrimony the wet and dry ingredients you just combined until just incorporated.
5. Sprinkle in baking soda and baking powder- Stir.
6. Add in melted butter, stirring constantly. Also, start preheating your skillet over medium to medium high.
7. When your pan is hot, add the two Tbsps. butter reserved and spread along the sides and bottoms to coat. Pan should be hot enough to readily melt the butter but not hot enough to scorch it.
8. Add batter to hot skillet.Smooth with a spatula and let set for 15-20 seconds.
9. Transfer skillet to oven and bake for 20-25 minutes until golden brown and beautiful.

Thursday, August 12, 2010

Sauteed Button Mushrooms

I am so ready for the leaves to start falling. ENOUGH of this Oklahoma summer, I say. I'm sweaty and I'm grumpy. I'm also out of bug spray so I can't even walk outside without getting eaten alive. Grrr...

Now, Autumn. That's a nice season... it makes me want things with earthy flavors and anything containing apples and raisins and cinnamon and rum in no particular order. It makes me anxiously anticipate cozy layers of fleece, scarves, and smartwool socks... I'm getting carried away again. I was a bit too excited yesterday about the upcoming season and bought a new jacket on Zappos. Too bad  it's still over a hundred flippin degrees here. Ugh.

Mushrooms taste like Fall to me. The fact that mushrooms are available year round in Oklahoma is great because, though I can't snuggle in my new jacket, I can at least savor the flavor of the season.  I never cared for mushrooms until I lived in Miam-uh and got introduced to JM Farms, a major supplier of mushrooms throughout the midwest located just a few miles northeast of my work. You'd think having first hand experience at the SMELL that goes along with mushroom growing would have turned me off but I was intrigued with the little things and they kept giving me free samples at our city business fairs. I'm a sucker for free samples. Unless you're giving out free green beans and then I'll tell you what you can do with them.

Here's a great recipe for sauteed button mushrooms. It's extremely simple and accessible year round in these parts. In the summer, you'll be grateful for a quick side that does't take forever to make over a hot stove. Whatever time of year, you'll love the freshness of it all.  You get highlights of meaty mushrooms without the butter pool which tends to accompany dishes of this kind.
Sauteed Button Mushrooms (Adapted from a recipe by Michael Chiarello)
5 tablespoons extra-virgin olive oil
1 1/2 pounds whole small button mushrooms, wiped clean
3 tablespoons butter
Gray sea salt or Kosher Salt
1 tablespoon minced garlic
1 1/2 teaspoons fresh thyme leaves, chopped
2 tablespoons lemon juice
1/2 cup white wine
1 tablespoon chopped parsley leaves


1.In a large skillet, heat the oil over high heat. Add the mushrooms. Do not move the mushrooms until they have caramelized on the bottom. If you toss them too soon or put them in too small of a pan, they will release their liquid and begin to steam. Steam is the enemy of browning and all that delicious carmelization. When the bottoms are caramelized, toss them and continue to cook for about 5 minutes.

2.Add the butter. Cook and toss for 5 minutes, until beautiful =) ( that means browned, of course.)

3.Season with salt and add the garlic. Saute another 2 minutes, and add the thyme, lemon juice, and white wine. Cook to evaporate the liquid.

4.Toss in the parsley and serve immediately.

Sunday, July 18, 2010

Sun-dried Tomato Pasta Salad

Tulsa is so flippin' hot right now that words cannot describe the sweaty, sticky, soppiness of my body. Actually, one word can: Gross. It's gross out there. If lunch time is upon you and if my introductory sentence didn't make you lose your appetite, you might want to consider this pasta salad. Try not to relegate this to the side of that same old sandwich...it can stand alone. And, it's cold. Plus, it features some lovely summer ingredients that will make you really happy and you'll forget that you hate summer and want Fall to arrive with all your heart. Except when Fall comes, you really start to miss all those fresh herbs and tomatoes that actually have flavor...it's a harsh cycle. One day, I'll embrace the flavors that are upon me when they are upon me but, what can I say? I'm always thinking ahead.  

Let me say one more thing before I proceed here... I typically dislike pasta salad. I can't get beyond the cold pasta with the salty mayo thing. I mean, it always sounds good in theory but I never quite enjoy it as much as I feel I should. This pasta salad has no mayo or unidentifiable cream laden bits. Instead, it is oil based and gains it's flavor from a rich base of sun-dried tomatoes, salty capers and olives ( which I actually enjoyed in this dish.) Throw in some fresh basil and sliced local tomatoes ( I used grape tomatoes from Livesay Orchards) and you're in summery bliss. 

Sun-dried Tomato Pasta Salad
(Serves 12-16----- makes for great leftovers!)
Adapted from Ina Garten: Barefoot Contessa Family Style

For the salad:
1lb corkscrew pasta such as fusili or rotini
About 1 cup assorted black olives, roughly sliced
1 pint cherry or grape tomatoes, sliced
10-15 basil leaves- chiffonade ( roll em up and slice thin!)
About 1 cup fresh grated parmesan cheese

For the dressing:
7 oz jar of sun-dried tomatoes in oil *
4-5 cloves of garlic, slightly crushed.
3 tbsp red wine vinegar
1 cup extra virgin olive oil**
Optional: 2 teaspoons capers
Salt and Pepper to taste

* You can also get sun-dried tomatoes that have been packed in seasoned oil. This recipe doesn't call for that but it's not a bad idea if you like the flavor variety. Just check your salt levels.
**You can choose to discard the oil from the sun-dried tomatoes and add a fresh cup of oil or you can use it here and just add enough new oil to make the total about 1 cup. It is especially tasty to retain that preseasoned oil we just talked about!

 
Add all dressing ingredients to a food processor and puree. That's your dressing! This can totally be made ahead of time and kept in the fridge.

For the pasta, boil until al dente in a large stock pot. Drain and allow to cool. Once cool, toss with dressing to coat. Stir in olives, basil, and tomatoes ( NOTE: if you're planning on making this in advance, I found that adding the tomatoes right before serving keeps things fresh and crisp. I have a thing with tomato consistency... you'll notice I don't even have them in there for the pic! Oops.) Keep chilled until ready to serve. Top with cheese.

Sunday, July 11, 2010

Peach and Blueberry Galette

It's the peak of peach season 'round these parts and a galette is a great way to whip up a summery treat. I love the charm of a rustic galette, which is basically a free form pie.  I suppose if I was rolling out pie dough already this would only be mildly easier than making a full fledge pie but, since I was cutting corners with premade dough, this was clearly the way to go. Everyone loved it and it made a great Fourth of July dessert.

Peach and Blueberry Galette (makes 2)

1 box pilsbury pie dough
6 cups sliced peaches
1 cup blueberries
1egg whites
1/4 cup raw sugar
1/2 cup white sugar


Instructions for one galette- bake individually for best results.

Add 1/2 cup white sugar to peaches and blueberries in a small bowl. Allow to macerate ( mix and do good things with the sugar) for about an hour.

Preheat oven to 350 degrees F.

Place one, round pie dough on a cookie sheet lined with parchment paper. Pour 1/2 of fruit in center of pie dough, leaving enough room around the edges to roll up around the sides.

Carefully fold the dough around the edges and brush with egg whites. Sprinkle with raw sugar.

Bake on center rack for 40-35 minutes until golden brown. Allow to cool before serving.

Monday, July 5, 2010

Chicken Enchiladas with Tomatillo Sauce


Miami, OK has two main sreets, one McDonalds, one Wal-Mart, and four Mexican restaurants. I freaked myself out the first time I said, "Anywhere sounds good....except mexican." Needless to say, standard Mexican fare has worn on me. And, by that, I mean standard American Mexican  food which has been reduced to picking a number off of a combo menu. I needed to experiment with more interesting flavors. Enter Chicken Enchiladas with Tomatillo Sauce. Number one- these aren't swimming in some sauce only distinguishable by its color. Number two- I think these might actually be healthy. I adapted this from the orginal because I really didn't want to ruin all the healthiness by deep frying the tortillas. The result was fresh, light, and very different from my standard #23. Bonus: These are super easy to make.


Chicken Enchiladas in Tomatillo Sauce
Adapted from Simply Mexican by Lourdes Castro
Serves 3-4

1 lb (about 3) boneless, skinless chicken breasts
2 cloves of garlic, slightly crushed
1 onion, halved
2 bay leaves
1 tsp dried oregano ( I only had ground and it seemed to work fine)
1/2 tsp. salt ( plus more to taste)
2 cups Fresh Tomatillo Salsa
3-5 Tbsp. olive oil
1 onion, sliced thin
Black pepper
9-12 fresh corn tortillas ( this really depends on how full you stuff 'em)
Cilantro sprigs for garnish
1/3 cup crumbled cotija or feta cheese
1 cup mexican crema (OR, you could do like I did and thin out some sour cream with milk)
Optional: shredded iceberg lettuce for garnish

First, poach the chicken. Add chicken, garlic, one onion ( 2 halves), bay leaves, oregano and 1/2 tsp salt to a large saucepan. Add enough water to cover the chicken and bring to a boil. Decrease heat and simmer ( low boil) for 35 minutes until chicken is done. To check, just slit the chicken and make sure it's no longer pink and the juices run clear.  Allow the chicken to cool in it's broth and when it's cool enough to handle, shred the chicken by hand or with two forks, pulling apart all those delicious fibers.

Note: You can prepare the chicken the day before. Just keep refridgerated.

Next, saute the second onion that you sliced in 1 tbps of oil. Toss in the shredded chicken when the onion is soft and translucent. Transfer to a bowl and set aside.

Meanwhile, heat the 2 cups of tomatillo sauce over medium heat. Also, prepare your tortillas by lightly pan frying ( 1 tbsp oil per two to three tortillas) the tortillas in a flat skillet until golden but still pliable.

Assembly:

To build the enchiladas, you need your serving platter or individual plates on hand. To assemble, fill a tortilla with the chicken and onion filling ( about 1/4 cup each) and roll, placing the seam side down on your plate. Once you have placed as many as you like on your platter or plate, top with heated tomatillo sauce and finish with crumbled cheese, mexican crema ( or thin sour cream), and sprigs of cilantro. Serve shredded lettuce alongside if you choose.

Thursday, July 1, 2010

Fresh Tomatillo Salsa


Yes, yes, I know the picture sucks. It's hard to frame up an awesome shot when you're hungry and trying to eat. The important thing here is that I made this and it was GOOD.  Also, I'm feeling real proud of myself because I went shopping for the ingredients on 21st and Garnett which was a pure stroke of genius (great produce, great prices) and I got to feel instantly transported to my homeland--Southern California. I felt... authentic. For those of you not familiar with the Tulsa area, 21st and Garnett is our hispanic district. I was scared to death someone would try to talk to me in spanish only to quickly discover that I'm the worst Mexican ever. Whatever, I can make a mean salsa verde and it's a nice break from the red stuff. Check it:

Fresh Tomatillo Salsa-  yield 2-3 cups
Adpated from Simply Mexican by Lourdes Castro

1 pound of tomatillos (that's about 9- pull them out of the husks, rinse, and quarter.)
2 jalepenos, stemmed and halved (Add more or less depending on your desired heat)
1 cup lightly packed cilantro leaves and stems
1 clove of garlic, slightly crushed
1/2 onion roughly chopped ( I used 2 green onions and it was tasty)
1/2 tsp. salt
2 Tbsp. water

Combine all ingredients in a food processor. Puree. Ole!

Can be stored for up to a week in the fridge in a container.


Thursday, June 24, 2010

Pasta with Shrimp and Cilantro-Lime Pesto


I'm on a pasta kick. Good for my tastebuds, bad for my physique. Also, bad for the butcher because I haven't seen a need to eat meat for dinner all week. We're talking about ME here... this must be some kind of record. Anyway, the pasta...

First, I'd like to give myself props for actually using my foodie magazine this month and also for not abandoning it when I realized I had no jalepenos last night. I grabbed the car keys and dashed to Reasors. I felt so freakin cool. And, it was worth it. Having never had any pesto other than basil pesto, I was hesitant but quite relieved to find this meal refreshing and completely repeatable. Plus, it introduced me to COTIJA cheese, a mexican hard cheese that crumbles beautifully much like Feta, though more mild in flavor. I'm already looking for another recipe in which to use it.

Pasta With Shrimp And Clilantro-Lime Pesto
Bon Apetit, July 2010 (Adapted from Tejas Texas Grill and Saloon)

Serves 4

1 1/4 cups (packed) fresh cliantro leaves plus 1/4 chopped
1/4 cup (scant) chopped green onions ---I did the full 1/4 because, why bother?
3 Tbsp fresh lime juice
2 garlic cloves, pressed
1 Tbsp chopped, seeded jalepeno ( do take care to seed it with a utensil, not your finger... especially if you wear contacts.)
1/2 cup plus 1 Tbsp olive oil
1 lb linguine
1 lb uncooked medium shrimp, peeled and deveined
3 Tbsps tequila ( Ole!)
1/4 cup crumbled Cotija cheese ( or good feta will work fine. Bad feta, will not.)

Blend 1 1/4 cups cilantro and next 4 ingredients in a food processor until a coarse puree forms. With machine running, gradually add 1/2 cup olive oil. Season generously with salt. It will taste too salty but this will be fine as it will flavor the rest of the dish well.

Do ahead- this can be done the day before. Just cover and chill.

Cook linguine in large pot of boiling watter until al dente. Drain.

Meanwhile, heat remaining Tbsp of olive oil in a heavy, large skillet over medium-high heat. Add shrimp and cook until almost opaque (about  minutes.) Remove from heat and add tequila. Return to heat and cook an additional 30 sec- 1 minute until liquids are syrupy.

Add pesto, stir to coat and remove from heat. Toss with drained pasta to coat and season with salt and pepper to taste ( I didn't add any seasonings other than the pesto!) Serve sprinkled with crumbled Cotija and chopped cilantro ( if you remembered it.)


Wednesday, June 23, 2010

Swiss Chard Spaghetti with Garlic Chips


We are now officially moved! I'm happy to say the only thing we've yet to unpack are several boxes of books due to a severe lack of bookcase space. I'm thinking it might be time to part with some of my college-era books...seriously doubting I'll be reading Makers of Modern Strategy: From Machiavelli to the Nuclear Age again anytime soon. Also, twenty back issues of Everyday with Rachel Ray may need to go. Tough decisions. Either way, who needs reading material when you live in a city with a bounty of fresh entertainment options?

My entertainment has consisted of grocery shopping seven times in past two weeks. SEVEN TIMES. One trip was a trip to an Indian grocer where I procured garlic ginger paste and tamarind concentrate which will hopefully come in handy while recreating Bhavna cooks.

But, the trip that's nearest to my heart at the moment was my visit to the farmers market where I scored some swiss chard. Some people have a strong aversion to swiss chard despite being greens eaters in general. I have no idea if I like greens or not (seeing as this is the only type I've ever had) but it's dang tasty and the fact that it hums a soothing melody of health as it melts in my mouth makes it my current heart of hearts.

I've adapted the following recipe as found on Smitten Kitchen. The difference is that I substitute feta cheese for freshly grated parmesan and I remove the olives....olives me no likey. The resulting version is bold and earthy and it doesn't get ruined by nasty olives. Bleh.


Swiss Chard with Spaghetti and Garlic Chips
Adapted from Gourmet: November 2008 as represented by Smitten Kitchen

Makes 4-6 servings (we halved this)

1/3 cup extra-virgin olive oil
1 head garlic, cloves peeled and thinly sliced (lengthwise or crosswise)
1 medium onion, finely chopped
2 pounds Swiss chard, stems and center ribs finely chopped and leaves coarsely chopped separately (Green Swiss chard is recommended though I used red and green this time with no problems... plus, it looks pretty.)
1/2 cup water
1 pound thin spaghetti ( plus water for cooking)
6 ounces freshly grated parmesan (1 1/2 cups)

Heat oil in a 12-inch heavy skillet over medium heat until it shimmers, then cook garlic, stirring, until golden, about 3 minutes. Transfer garlic with a slotted spoon to paper towels to drain. (Be really careful not to let it burn. It's a total jerk when it burns. Believe me.)

Cook onion in oil remaining in skillet over medium heat, stirring occasionally, until softened, 3 to 5 minutes.

Stir chard stems into onion mixture with water and 3/4 teaspoon each of salt and pepper. Cook, covered, over medium-high heat until almost tender, about 5 minutes. Stir in chard leaves and cook, covered, until stems and leaves are tender, about 5 minutes.

Meanwhile, cook spaghetti in a pasta pot of boiling salted water (2 tablespoons salt for 5 quarts water) until al dente. Reserve 1 cup pasta-cooking water and drain spaghetti.

Toss hot spaghetti with chard leaves and 1/2 cup cooking water, adding more cooking water if necessary. Season with salt and pepper. Stir in parmesan cheese. Sprinkle with garlic chips and more cheese if desired.

Friday, May 14, 2010

We're Moving!

Guess what? We're moving.

As in packing boxes, signing papers, fixing faucets, renting U-hauls, MOVING.

Squee!

No more weekened trips to get rare* produce. (* Swiss Chard! Fingerling Potatoes!) No more lengthy intervals between me and Pei Wei Lettuce Wraps ( my new love.) Seriously, though, to everything (turn, turn, turn) there is a season and our time in Miami is just... no more. That's not to say we haven't met some great people, made lasting friendships, or that we won't miss it in any way. But, it is to say, we're moving on to a new place and energy in our lives... and working appliances.

I've been deprived of my oven for the past couple months ( our house's last ditch effort to suck us dry of funds and trap us here forever) so, not only do I get to relocate to the big city, I also get a sparkly new oven.

Maybe I'll finally get around to roasting some cornish game hens in the new one...

For now, I'm becoming quite the stove top gourmet while trying to use up odd ingredients in my pantry so I don't have to pack them. Also trying to clear out the freezer, which reminds me, if you've ever got five chicken thighs you need to use up, don't boil them. That's all I have to say about that.

Saturday, April 3, 2010

Ginger Steak Salad


Don't let the word "salad" fool you... this Ginger Steak Salad is a main course, completely filling and packed with flavor. I want to relive it for a moment here...the marinated steak served hot over crisp spring greans with blanched snow peas and topped with a sweet and spicy asian- inspired dressing... Aubrey stopped speaking entirely. Not that he was chattering away or anything but when he did speak, it was to the point: "This could be the best thing I've ever had." Look out Thai Salmon.

This recipe was influenced by The Pioneer Woman's Ginger Steak Salad and is pretty much the same except I added Sriracha in place of jalepeno in the dressing and added sweet snow peas and crisp red onion for color and crunch. I think they gave a nice fresh balance to the rich steak.

Ginger Steak Salad (Serves 2-3 BIG salads)

For Steak Marinade:


2 Tbsp. Soy Sauce
1 Tbsp. Sherry
2 cloves Garlic, Minced
2 tsp. Brown Sugar
1 whole Rib-eye, Strip, Or Sirloin Steak ( I used sirloin and will probably try Rib-eye next time as it was a little tough.)
2 Tbsp. Extra Virgin Olive Oil

For Dressing:


2 Tbsp. Olive Oil
2 Tbsp. Soy Sauce
2 Tbsp. White Sugar
1 Tbsp. Lime Juice
2 cloves Garlic, Finely Diced
1 Tbsp. Fresh Ginger, Minced
1 Tbsp. SRIRACHA!


For Salad:

1/2 Red onion thin sliced lengthwise
5-8 oz ( 1 small package) of Organic Spring Greens

4 oz. fresh snow peas, blanched ( boil 2-3 minutes- let cool.)


1. Combine steak marinade ingredients in a Ziploc bag or shallow dish. Mix and insert steak. Marinate 30 min. - 2 hours.


2. Whisk together salad dressing ingredients. Set aside.


3.When steak is finished marinating, add 2 tablespoons olive oil to a hot skillet or grill pan. Cook steak about 1 1/2 minutes per side, or until medium rare. Remove from skillet and place on cutting board and allow to rest for 5- 8 minutes. Slice thin against the grain, working at an angle. TIP: prep board with a bit of olive oil and sprinkle with kosher salt to avoid losing any delicious flavor. Yeah, I learned that from The Naked Chef.


4. Mound salad greens on a platter or individual plates. Toss with peas and most of red onion. Top with sliced steak. Drizzle salad dressing over the top. Sprinkle with more red onion on top and you're all set.


I highly recommend serving with firecracker shrimp. Be sure to reserve some dressing for dipping.

Thursday, April 1, 2010

Firecracker Shrimp


I made P-Dub's Ginger Steak Salad for dinner tonight and had some last minute inspiration to make Firecracker Shrimp in the style of Jaden at Steamy Kitchen. They practically have the same ingredients as the salad dressing so I thought, why the heck not?

"How many shrimp appetizer things do you think would be enough?" I yelled from the kitchen. Response: "Uhhhh.... " --- In Aubrey-speak, that means, "How long have you known me ? You call yourself my wife?" So, I made 14. He ate 10 of them. For perspective, these are JUMBO shrimpys. As in, not small. I can't blame him, though. They were super tasty and fairly easy to make. Probably even easier if I had read all of Jaden's tips beforehand.

Pioneer Woman has a recipe for firecracker shrimp which calls for SIRACHA sauce. Steamy Kitchen's version calls for sweet chili sauce of which I had none. So, I did a hybrid and replaced the sweet chili with the hot chili and it came out amazing.

Here's my adaptation though I highly recommend checking out the original recipe for some great tips that I missed ( which resulted in curly shrimp and less than uniform frying)....

Firecracker Shrimp (in the joint styles of Steamy Kitchen and Pioneer Woman)

14 large tail-on shrimp, deveined and nicked (basically cut three little nicks in the curve of the shrimp to make it lie flat- I read this tip halfway through.)

7 eggroll/springroll wrappers, cut in half diagonally (2 triangles)

oil for frying

Marinade ( this quantity is enough for 20-25 shrimp)

1 tsp. grated garlic
1/2 tsp. grated ginger
1/2 tsp. sesame oil
1 1/2 tsp. soy sauce
1 1/2 tsp. SIRACHA!
1 tsp cornstarch

Cornstarch Paste- mix well to combine

1 Tb cornstarch
1/4 cup water

1. Combine marinade ingredients in a bowl and marinate shrimp for 20 minutes.

2. Pat dry each shrimp with a paper towel. Wrap each shrimp in a wrapper half. Seal with cornstarch paste. You can see detailed pics of how all this is done and why here.

3. Fry in hot oil for 3 minutes, until golden brown and shrimp is cooked through. Transfer to papertowel lined plate to sop up oil.

Serve with SIRACHA! for dipping ( also, if you're making the Ginger Steak Salad, the dressing is a fab dip, too.)

Monday, March 29, 2010

The Worst Mexican Ever Series: White Chicken Chili


It's time to be real... It's time for you to see what I make when the camera isn't snapping away...

It's time for you to see that my cats get on my countertops.


This is White Chicken Chili- pure canned goodness. I'm sorry I've been hiding it from you.


I like to make myself believe I'm too cool for canned goods but, I'm not. I don't make my own stock and I've never refried a bean. Someday I'll get there...maybe. Taco Bell makes some mean canned refried beans...

I've been eyeballing this white chicken chili recipe at Simply Recipes for some time but can't bring myself away from my new standby. Authentic? Probably not. Amazing? Totally. Friends from work serve this at parties and potlucks and I finally got the recipe. I almost always have ingredients on hand and it makes up in ten minutes.


Since I'm going full disclosure here, you'd better look at this:


You try to resist giving them a little canned chicken juice. Now you know.


One more thing... I have trouble following recipes exactly. You see that can of diced tomatoes up there? That was supposed to be a can of Rotel. I didn't catch this until I already added it so I diced up some leftover pickled jalepenos I had from making this and added crushed red pepper. It came out awesome prompting Aubrey to proclaim my "homemade version" to be the best ever.
Truth is good.


White Chicken Chili


1 can of Great Northern Beans
1 can of Rotel ( hot, mild, whatever. Or, diced tomatoes and add your own peppers.)
1 can cooked chicken breast
1 can corn
1 package white chicken chili mix
Optional Garnish-
Sliced Scallions
Sour Cream
Grated Cheese ( I use jack or colby jack)
Special Equipment: Can opener
1. Add all ingredients to a big pot. Bring to a low boil and simmer 10 minutes.
Serve on tortilla chips and garnish as desired.

Sunday, March 21, 2010

Indian Home Cooking

I have many excuses for not posting more frequently (boring flatwear, overuse of the same dishes, general lack of cooking adventure as of late.... you know, that sort of thing. ) So, it was high time to let someone else do the cooking and reignite the passion for trying new things.

My new friend Bhavna is from the south of India and can whip up a mean meal. First, she offerred to cook me dinner which turned into dinner for me and Aubrey... which somehow turned into dinner for seven. The prospect of home cooked Indian food can really draw a crowd.


With the promise of a guided trip to the grocery store to learn how to make all this stuff, Bhavna set out on making us a many coursed meal of Aloo Paratha, Eggplant Curry, Masoor Ke Daal, and basmati rice. Aloo Paratha is a potato stuffed bread similar to naan except stuffed with a potato mixture and served with sweetened yogurt and a type of mint flavored yogurt of which I do not know the name. The Masoor ke Daal was a form of lentil soup which I had never had. I mean, it never actually dawned on me that the only Indian food I'd ever eaten was probably the equivalent of Indian fastfood... imagine if the only American food anyone ever experienced was McDonalds. Bhavna showed us the light.

Even Aubrey got involved rolling out the parathas.
We all sat down to the awesomeness and my friend's son proclaimed the meal to be the best Indian food he'd ever had. He was right. It was amazing. I can't wait to learn the recipes and share them here. Particularly the Aloo Parathas... hello, love. This new friendship is very fortuitous, indeed! Don't worry I have stuff to offer, too. Bhavna has never had a biscuit.

Monday, February 15, 2010

Artisan Bread in 5 Minutes A Day - Review and Master Recipe


Wait! Before I delve into a long love story about the bread above, I just want to say that I couldn't muster up the energy to make another batch of blueberry muffins. I tried. I bought the blueberries and everything....they went moldy. Let's just say, we were blueberry muffined out and nothing, not even the allure of content for this here blog, could make me bake more. Besides, Round 2 totally won and I declare them the undefeated champion until I feel like making blueberry muffins again. Or, blueberry anything. Don't worry...it'll happen soon.


Now, what you've come here to hear about... The bread. The wonderous, crackly bounty of your fantasies. My fantasies include a river of nutella and a visit from Legends of the Fall era Brad Pitt. Who's with me? Oh, yes. The bread...


In the time it took me to ramble on and the time it took you to seriously consider going to do the dishes, you could have been well on your way to artisan bread thanks to the science and craft of Jeff Hertzberg, M.D. and Zoe Francois and their book Artisan Bread in Five Minutes a Day. I swear, I've been carrying around this thing like a bible.


I've craved the crackle ever since our first trip across the pond and haven't been able to satisfy my urges to slather butter and aged cheese on a worthy recipient. France has us whooped in the baking department and I just can't handle grocery store bread anymore. Except, I've been forced to do so...either that or shell out 6-8 bucks for a good quality boule which also requires a drive to the city. NO MORE, I SAY.

I made two loaves in two days and it's all because this one genuis idea... you can store high moisture dough in the fridge for over a week. Yes, you can.

I read the master recipe on Ivory Hut and gave it a go only to realize I needed to financially support the wonderment and buy the whole book. The end product is not much different in taste than my previous bread making attempt but it's all about the texture and aging. I find this method to give me crisper crust, chewier crumb, and more depth in flavor as the week progresses. I will now share the master recipe with you in the hopes that you can discover a life filled with baked goodness ( and, go get some nutella, too...oh, and buy the book. You'll love it.)

The Master Recipe ( Makes four 1 lb. loaves--- we did halfsies)

3 cups lukewarm water
1.5 Tbsp. granulated yeast ( or two packets of instant yeast)
1. 5 Tbsp. kosher salt
6.5 cups unsifted, unbleaches all purpose white flour measured by scooping with minimal pressure and sweeping off level ( I don't know why this is specified in every recipe in this book but I went with it and it worked fine- normally I spoon in and then sweep.)

Cornmeal for dusting

Special equipment: Pizza stone or other baking stone ( not totally necessary but important for the crackle.) Large 5 qt. lidded container.
1. Warm water slightly to about body temperature and add yeast and salt. You can add make this in a large mixing bowl or a lidded 5 quart container ( that way, you only dirty one thing because you're gonna store this stuff in the container. Or, you can start all this off in a 14 cup food processor or stand mixer.

2. Mix in flour until uniformly moist. Either do this by hand, with spoon, or in a 14 cup food processor or stand mixer, both fitted with a dough hook.


3. That's it. Once uniformly mixed, let it rest at room temperature for 2 hours. After 2 hours, you can make it or refrigerate the dough.

4. Once you're ready to bake, liberally sprinkle cornmeal on a pizza peel ( not the stone) or cutting board or counter top. This is where you're going to set your loaf to rise and you don't want it to stick.

5. Sprinkle the surface of your dough with flour and pull off a grapefruit size hunk ( that's about 1 lb.) Quickly form it into a ball by the "gluten cloak" method-- this means, stretch the surface of the dough around to the bottom, rotating the ball a quarter turn until all sides are tucked under. Resist the urge to knead- this whole process should take 30-60 seconds. Set the seam side down on the corn meal and let it rest for 40 minutes.

6. 20 minutes into the rest period, preheat your oven to 450 degrees F and make sure you have an empty broiler tray in there and the stone on the middle rack.

7. When the dough has rested for 40 minutes, dust it with flour ( dusted a bit too much) and score with a serrated knife into a pattern (tic tac toe, stripes, x marks the stop, etc.) and then carefully place your ball on the stone and return to the oven. Quickly dump about 1 cup of tap water into the broiling tray and shut the door real fast to trap the steam. THIS IS THE KEY TO THE MAGIC.

8. Bake for 30 minutes. Try to let it cool completely before you break in. Oh, when it first comes out, listen to it sing. Oh, the merriment. Confused about the 5 minutes part? Well, the whole process takes about 5 minutes of actual interaction with the stuff...maybe 15 minutes tops once you've cleaned everything up. I say, that's pretty good since I could be doing plenty of other stuff in between and still have hot bread in record time per day. And, it's yum.

Tuesday, January 12, 2010

Blueberry Muffins: Round 2


There was no melty blueberry goodness in round 1. There was no inviting perspiration in round 1. This muffin brought it.

Aptly titled, the "To Die For Blueberry Muffins" are a serious front runner in my quest to find the best blueberry muffin recipe, ever. I think I may have to limit myself to three challengers ( and, I might pick a wimp for the third try so this one can win.) These were so moist, dense, and delicious... no residue but I'm starting to think that might be a good thing.

Something of note: the batter was like glue, keeping the berries from sinking to the bottom which I didn't even know I cared about until I realized I fully appreciated the even distribution. So, I checked back to round 1 muffins... there's no comparison.

(Oh, sorry about round 1, Trisha Yearwood. For what it's worth, I really liked your baked beans recipe and I sang "She's in love with the boy" for about three years straight....)

I found this recipe thanks to the fine community of Allrecipes.com I really like that there's a strong following at allrecipes.com providing invaluable information on how the recipes turn out, along with modification suggestions. I followed some advice and cut down the quantity of the crumb topping and did a 1/2 c. brown sugar + 1/4 c. white sugar mix ( instead of the 3/4 c. white sugar called for...this is because I ran out of white sugar.)


Crumb topping? Yes, that's right... and all was right with the world.


I'm not kidding. These are scary good. Seriously, look at this face I found in my evenly distributed berries...


Scary Good Blueberry Muffins

Source: Adapted from "To Die For Blueberry Muffins" by Colleen on Allrecipes.com
Yield- 7 big muffins

Ingredients

  • 1 1/2 cups all purpose flour
  • 1/4 cup white sugar
  • 1/2 cup brown sugar
  • 1/2 tsp. salt
  • 2 tsp. baking powder
  • 1/3 cup vegetable oil
  • one large egg, beaten
  • approximately 1/3 cup milk ( you'll see why the approximation)
  • 1 cup fresh blueberries

For the topping:

  • 1/8 cup white sugar
  • 1/8 cup unsalted butter, cubed ( 1/4 stick)
  • 1/8 cup flour
  • 1 tsp. ground cinnamon

1. Preheat oven to 400 degrees. Line muffin tin with muffin liners.

2. Combine flour, sugar, salt, and baking powder in a bowl.

3. Add 1/3 cup vegetable oil and egg in a 1 cup measuring cup. Add milk until the total volume of all wet ingredients is 1 cup. Add wet ingredients to flour/sugar mix, gently stirring until dry ingredients are just blended.

4. Fold in blueberries then spoon into muffin tin.

5. To make crumb topping, cut the sugar, flour, butter, and cinnamon together in a small bowl with a fork until a coarse meal forms.

6. Top muffins with crumb mixture and bake at 400 degrees for 5 minutes then lower temperature to 350 and bake an additional 15-20 minutes or until a toothpick inserted comes out clean. ( The temperature change makes the outside crumb crust a bit crispy while preventing burning...I'm getting the hang of this.)

Sunday, January 10, 2010

Blueberry Muffins- Round 1

I dig a good blueberry muffin... the ones that are super moist, chewy, and leave a little residue in your mouth for hours after you eat them. The tops are sometimes sticky, too. Yeah, those ones.


As I sit here on this bitter cold Sunday (the first day I've had to actually sit and chill since the year started) I found myself craving the above. With a pint of blueberries in the fridge, WHY THE HECK NOT? Exactly. I mean, nevermind the fact that I gained 10 pounds over the last month eating every cookie and confection in sight. Oh, and nevermind that every gadget I have is on the fritz and not configured properly. You know how they say never make three major life changes in one year? Well, I think that should include technological devices...trust me, switching a computer, a cell phone, and cable service in the same week is bad news for post-holiday destress.

Anyway, about the muffins.

These Blueberry muffins were made with Trisha Yearwood's recipe in "Georgia Cooking in an Oklahoma Kitchen." They're good but not what I was after... remember the residue of which I spoke? Not happening here. However, you might find these up your alley if your style of muffin is light, moist, and more breadlike. I consider these a success either way since I didn't burn them.

Nevertheless, the quest for my dream blueberry muffin is now on.


Blueberry Muffins

Source: Georgia Cooking in an Oklahoma Kitchen by Trisha Yearwood

Yeild: 16-18 muffins

Ingredients

  • 2 cups all purpose flour
  • 3/4 cup sugar
  • 1 Tbsp baking powder
  • 1/2 tsp. salt
  • 1/2 tsp. ground cinnamon
  • 1/2 cup ( 1 stick) melted butter
  • 1/2 cup milk
  • 2 large eggs, beaten
  • 1/2 tsp. vanilla extract
  • 1 1/2 cups fresh blueberries

1. Preheat oven to 350 and place liners in your muffin tin.

2. Sift dry ingredients together in a medium size mixing bowl . Make a well in the center and add butter, milk , eggs, and vanilla, stirring just enough to moisten the flour. Gently fold in blueberries.

3. Spoon batter into the lined muffin tin. Bake 25 minutes or until a toothpick inserted in a muffin comes out clean.

OH, hey! If you have a blueberry muffin recipe you think I'll like, hook me up! Thanks.